Unreal Animal Prints
Project Objective
Start the lesson by providing a brief biography of Kenojuak Ashevak, emphasizing her heritage and involvement in the West Baffin Co-operative.
Show examples of Kenojuak's artwork that reflect her imaginative representations of animals and the surrounding landscape.
Instruct students to think of an animal that lives near them and create a drawing of that animal from their imagination on paper. They can incorporate multiple animals, people, and plants into their drawings, similar to Kenojuak's approach.
Guide students in preparing their artwork for display and facilitate a presentation where they discuss their creations and the significance of their imaginative approach to art.
Required Materials
Age Group
Resources
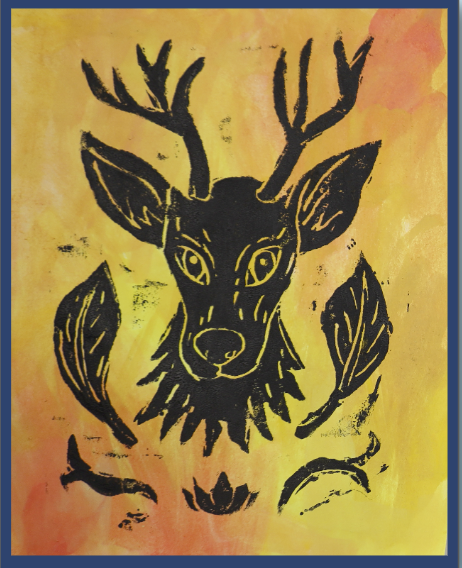
| Students will get inspired by the plants and animals around them!
Step One Have students think of an animal that lives nearby and draw it from their imagination on paper. Students can add other animals, people, and plants to make their drawing even more exciting, just like Kenojuak did. |
| Step Two
Students will place their drawing on top of a piece of polystyrene and attach it with tape to keep it in place. |
| Step Three
Students will use a (colored) pencil to trace their drawings onto the polystyrene. Make sure that students press down firmly but do not tear the paper. |
| Step Four
Students will lift their drawing and check to see if the image has fully transferred. There will be a faint impression on the polystyrene surface. |
| Step Five
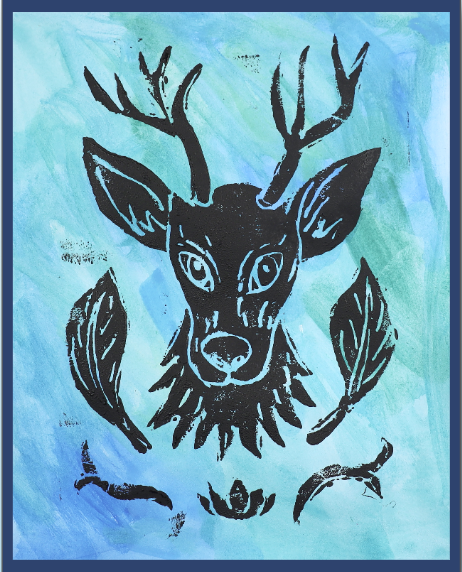
Students will trace over the impression of their drawing on the polystyrene. Encourage students to add details or textures to their animals, such as feathers or fur, to their animals. |
| Step Six
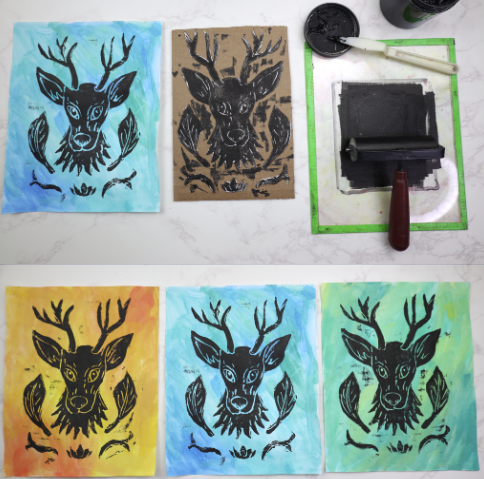
Students will cut out their animal and other pieces of their drawing. If a piece breaks, they can still attach it to the cardboard. |
| Step Seven
Students will arrange and glue all the pieces on a sheet of cardboard. The assembled cardboard is their printing plate. Students will write their names on the cardboard, placing their artwork in a safe place to dry until the following class. |
| Step Eight
Students will paint a background for their animal. Students can choose to use a specific color scheme or their imaginations. I used an analogous color scheme for my background. Analogous colors are located next to each other on the color wheel. Students can also use warm or cool color schemes. |
| Step Nine
Students will apply ink onto an inking plate, using a brayer to spread the ink onto their printing plate evenly. |
| Step Ten
Students will place the painted paper color-down on their printing plate. They will then use their fist or a baren to gently rub the back of the paper so the ink transfers. |
| Step Eleven
Students will carefully lift the paper and place it somewhere safe to dry. |
| Students will make multiple prints of their unreal animals. The teacher should encourage students to experiment using different painted backgrounds. |
| Have your students select their favorite print to send to Art to Remember. |
| Students will share their work with others. The teacher should encourage a supportive and constructive discussion among students as they explain the animal they imagined, their creative process, and how they transferred something from the real to the unreal. |